This is just a quick comparison to show the difference between rendering with the CPU and with the graphics card (GPU).
40.03 seconds compared to 2.98 is a fairly large difference and it becomes very apparent when waiting for a render.
Words don't do the numbers justice:
I hope Blender Cycles gets OpenCL (non-proprietary and available to both Nvidia and AMD video cards) support soon, the difference is pretty large. This also helps show what an improvement the GPU is over the CPU for certain tasks in general. This has yet to be fully utilized in games, hopefully once OpenCL gets going we'll see games take full advantage of it.
I recorded a speed painting to show it in action, you can see it on Youtube below:
Here's the new interface, though the default is different of course, this is how I have it set up. There are a number of improvements on 2.6.11 that I was able to spot, as well as a few issues of course:
Single window mode is great
Absolute and relative control over slider bars for better control
It's now easier to see where to click & drag to resize windows
Layers are shorter and more compact and efficient
So many Paint Dynamics! For me this is the best feature
A much improved make seamless filter which doesn't give "blurred" results
Improved selection graphics, the lasso tool is especially nice
Brush outlines no longer take up huge amounts of processing time, a real issue before
Paint Dynamics are quite difficult to get to and slow the painting process down
Quick access to most used dynamics - size & opacity > on/off and simple curves would be nice
Not sure why some sliders do not look the same (navigator zoom and the opacity sliders)
"Export" instead of "save as a copy" for .jpg etc takes getting used to at first
Bugs, though they are to be expected in an unstable release
Overall, while some aspects feel slow and clumsy, it is very nice to use and seems much more professional than previous versions. Click for larger version:
I also dabbled in MyPaint which was interesting, though I sorely missed having the powerful features of Gimp such as masks, selections, filters etc. MyPaint is a program which simply "feels" fantastic to work in, everything is so smooth, it reminds me of swimming for some reason. I'd really like to be able to quickly transfer my work from Gimp to MyPaint and back since they both have fantastic features. I did a quick paint-over of a simple in Gimp, sketch done in MyPaint. Result below:
Ah, the fluid post is on the way, I hope, it turned out it was more work than I anticipated. I'm rendering the last of the flooded sub corridor though, more on the way :)
I only just discovered that you can try out Gimp 2.7.4, the latest
version of Gimp and a step closer to the fabled Gimp 2.8 I've been
waiting for. I was off to a bit of a rough start, but ended up over at
Partha's Place (http://www.partha.com/) where he has provided binaries,
many thanks!
After an hour or so playing around like a
child with the new toy he's been waiting on since the last Christmas
I've got mixed feelings. I really like some of the changes and new
features yet at the same time the whole thing feels much more clumsy and
harder to use.
Take the "Paint Dynamics" for example:
to change the curve of the pressure-dependent size dynamic you must
locate the Tool Options window, click on the Dynamics icon which will
then bring up a quick menu containing the Dynamics presets, click on another
Dynamics icon, this time small and right down the bottom, then the
"Paint Dynamics" window will appear, you can then either double click on
an entry to edit it (keeping in mind it will edit that entry for all
brushes which use it) or click on the "Create new dynamics" button
which will bring up the old "Brush Dynamics" menu that used to rest in
the Tool Options window, you must then click on Size-Pressure to enable
pressure dependent size and then near the top you must click on the drop
down menu with "Mapping matrix" written on it and select size. Sorry
that sentence was getting far too long, ran out of breath. Next you must
manipulate the curve to produce the results you want, also keeping in
mind that it doesn't tell you anything, which axis is pressure and which
is size? Up, down, left, right? Sorry, that's as confusing and time
consuming as the process I just described, a picture might convey things
better:
That's
simple enough, right? But what are we comparing it to? What I just
described is basically the same thing as the "Power" slider in Gimp
Painter - oops, I just gave away the end of this story didn't I.
Let's take a look at that same process in Gimp Painter:
I
don't want to end on that note of course, I'm very grateful to everyone
who contributes to Gimp, I love the program, but the new interface
needs a lot of streamlining.
Grass is one of the most important things in a game environment and adds immensely to the believability of the scene. Compare the following, the same scene with no grass or bushes and then with:
Without grass it's easy to pick up the tell-tale signs that you're playing a game: you can see the sharp edges of the ground mesh, see the perfectly sharp edges where objects intersect the ground and each other, see the flat ground textures etc.
I'll just go over some of the things I've learned while painting and creating grass in 3D.
Think of the grass and ground as a single object.
You don't need to do this if you can make all of the grass with geometry, but that's a lot of geometry. So if you can't do that it means you're going to have to use a ground texture that looks like grass, the problem with this is that a simple flat texture looks flat, so to add depth you add grass geometry.
When making the grass it's important to see it and the ground as a single object, not two separate ones. In relation to the ground texture the grass is simply breaking up the “flatness” of it and tricking you into believing that you're seeing real grass instead of a computer's representation of it. Therefore your grass and ground texture should compliment each other.
This brings me to the second point:
The grass texture should be different but extremely similar to the ground texture.
This may at first sound confusing, so let me explain what I mean. You don't want the grass to be so different it looks like you stuck a few textured planes on the ground (which is pretty much what's happening), yet you also don't want them to be so similar that the grass melts into the ground as if invisible, that would defeat the whole purpose.
You need to make the grass look as though it belongs, it should match (although not perfectly) the saturation and value of the ground beneath it while being visible. The best way to do this is to have the base of the grass join the ground as seamlessly as possible yet have the top different enough to be visible. This will give the best results.
Final touches
Toward the end you can add some extra details that will make the grass look a lot more interesting and realistic as well.
Ambient Occlusion – this is a tricky one, you want enough for the effect to be visible but not so much the grass sticks out. Carefully darken the base of the grass and test to see the results. You'll be able to get away with a bit here but go too far and the grass will start to separate from the ground.
Lighten ends – lightening the ends of the grass strands can really help make it pop out from the background, you want the grass to be grounded and blend into the ground texture but you certainly don't want the top to be lost. This will help add depth.
Colour variation – real grass is not made of a single colour, there are dead strands, strands that have subsurface light scattering going on, disease spots, reflections and all other manner of things that influence the colour. Putting in some of these colours makes it much more believable. Good colours to use are yellows, oranges, browns and greys.
Below you can see the grass I used for the previous scene as well as the ground texture it was designed to sit on:
I hope you got something out of this, good luck :)
This morning I did my first nude modeling for life drawing, which I've wanted to do for ages now. I was fine until about 24 hours before, when it finally sank in that I'd be naked in front of a bunch of people, at which point I was a little nervous. That was almost entirely replaced by worry that I wouldn't be able to come up with enough interesting poses and be standing there awkwardly. In the end I wasn't really all that embarrassed or nervous about the nudity (although my heart jumped a bit when it was time to start).
It was pretty good though, I went all out on the 2 minute poses and I'm pretty tried now. In an effort not to replicate the previous pose I got gradually more ridiculous until about pose 5/10 where I was "squatting", balancing on one foot with the other on my shin, arched over supported by one arm with the other over my head. I only just held that and was shaking by the end so I eased off a bit and remembered to alternate between difficult and "resting" poses.
I also got given a really great drawing of myself which is awesome. Overall it was a really cool experience, definitely glad I did it. I'd do it again :)
Here are some studies I did today, again from moreguefile references. Having a time limit really helps, you can't over-detail and you can't drop out halfway through :)
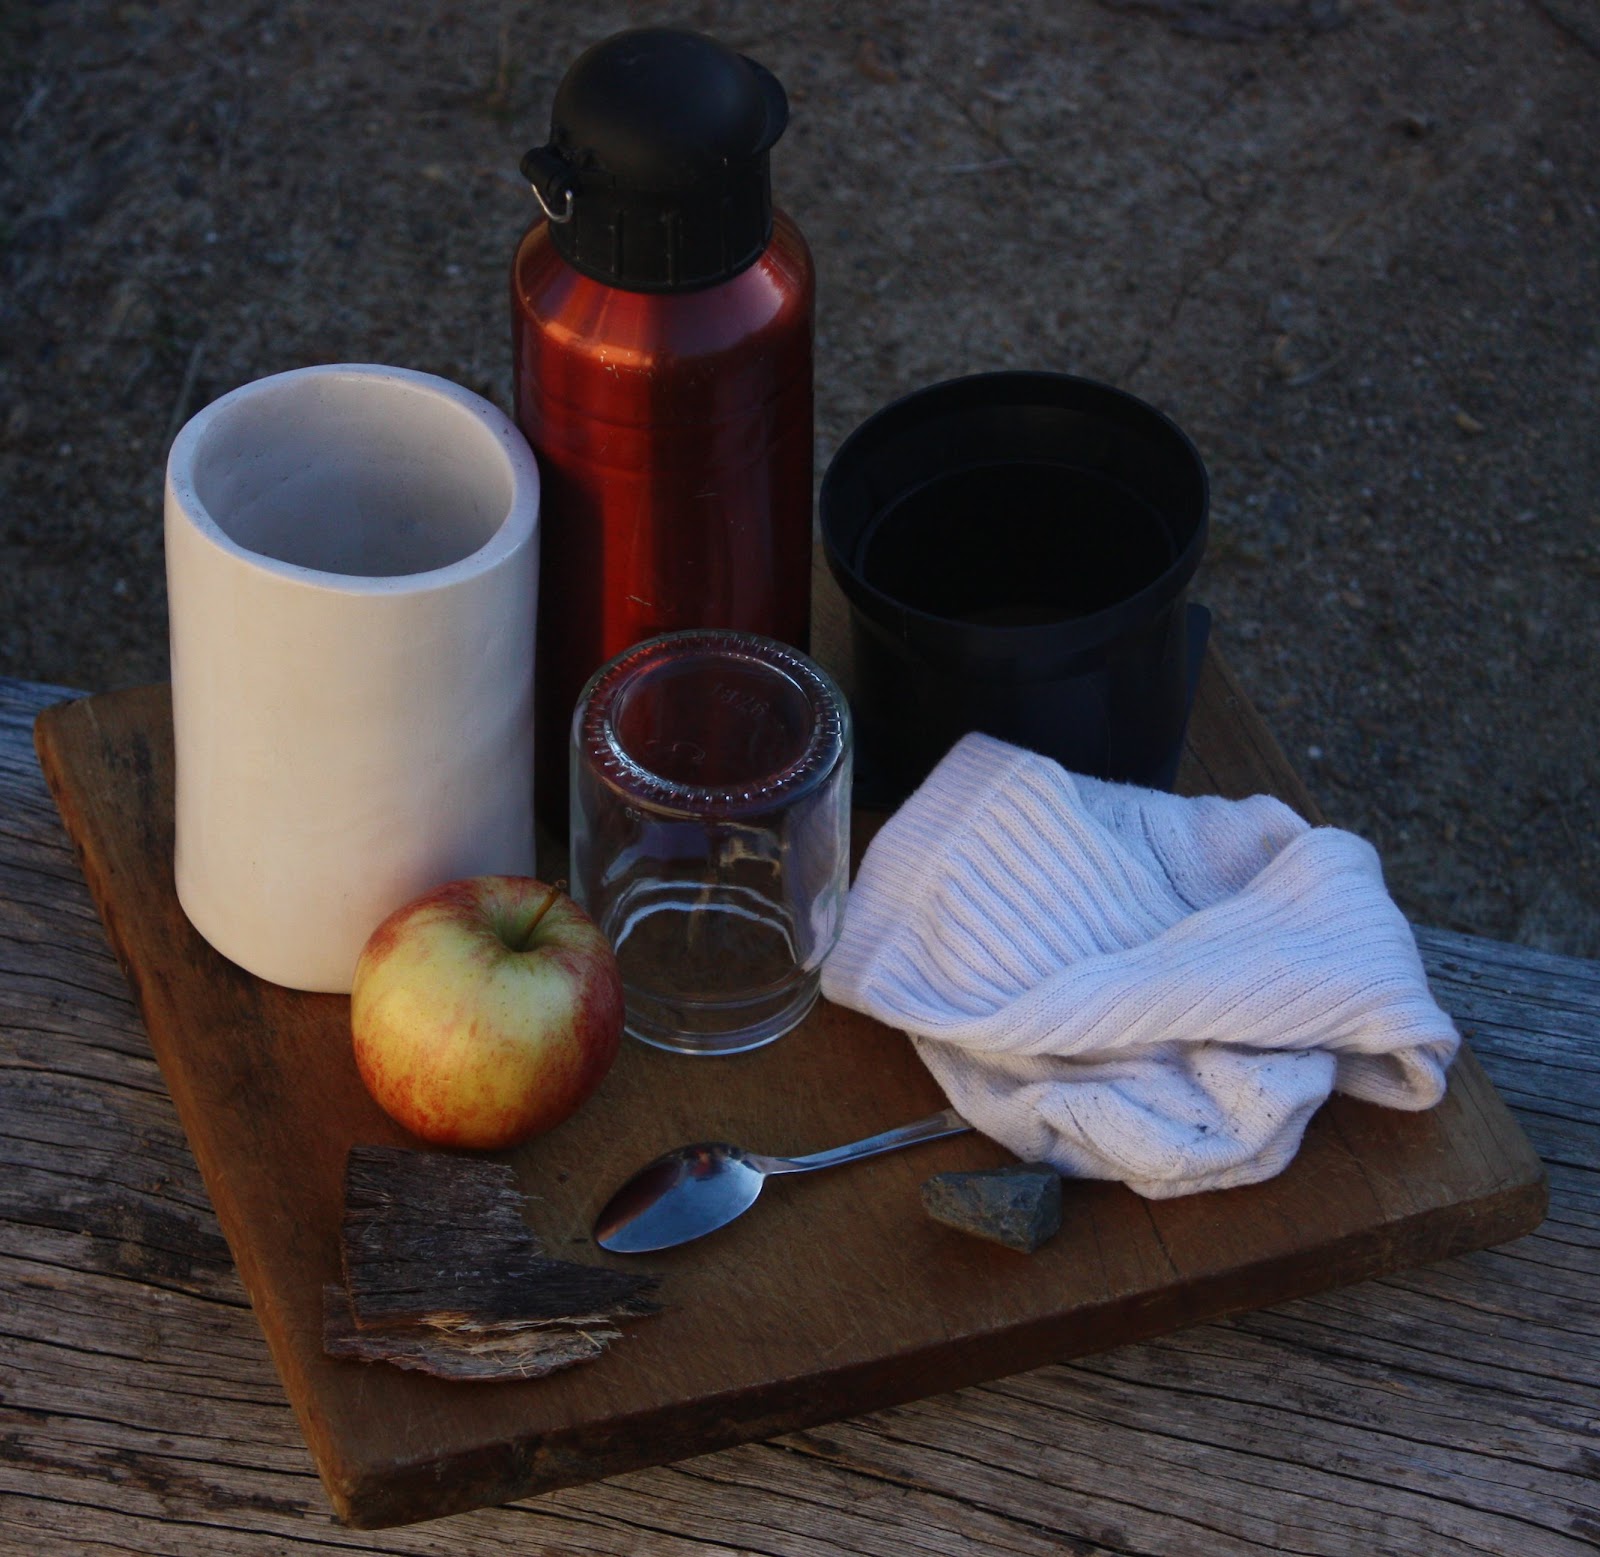
A few days ago I came up with an idea for a study. I wanted to know how to paint various lights and also how to paint the value and colour of shadows correctly.
I grabbed a wooden board and threw a bunch of different objects on it, an old white sock, drinking bottle, a spoon, some broken bark, etc. Throughout the day I went about photographing this setup in different light at different times of the day, in shadow, with bounce light, I even did a few using my PC monitors as lights (turned out to be a pretty quick way of getting coloured light sources thanks to gimp). Here are some shots I took:
The main thing I wanted to try out here was to find out how to correctly shade shadowed objects. By taking two pictures at the same time of day - one in full sunlight and the other in shadow - I was going to use a multiply layer to paint on the lit one until it matched the shadowed one, switch the layer to normal and I'd have the answer to solve all my problems right?
Here's the finished multiply layer over the apple in the light (left). I've added in the background from the shadowed shot for better comparison. Pretty similar?
The interesting part is when we change the layer mode to normal, that will reveal the colours that went into the realistic shadowed effect.
Perhaps I shouldn't have been so shocked, but this was an awesome moment. It's basically a dull chrome ball right? All the colours there and their values are a pretty good representation of the colours around my setup on the day of the shot.
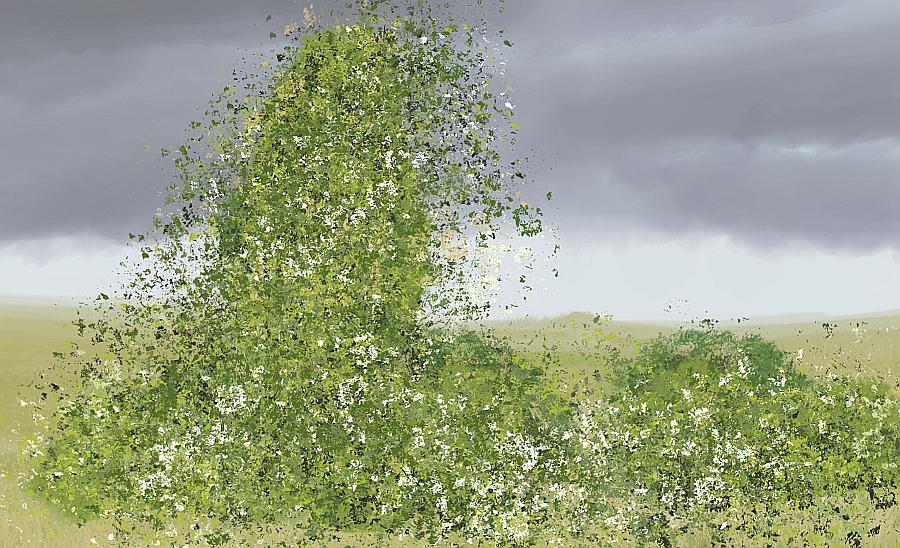
I'm still not done with this, but I'm pretty sure that to get a realistic effect you work out the reflection on the object, however, I'm almost certain it's not really a reflection effect, it's more like like: for every point on the object the light must be calculated individually and the brightness and angle from that point must be taken into account.
Above, for the point chosen, light blue would be the main light source (assuming the object is in shadow). The sky is going to be brighter than the ground and the trees quite dark. The grass below would be bright, however it's on a very extreme angle so very little of it would be cast on the selected point.
It's been good though, I always had trouble with interior scenes with harsh artificial lighting, but I now understand it much more, especially how to colour those objects. Even though the colour changes that an object undergoes when in shadow are incredibly complicated studying it has helped me understand how it all works.
Hi, in this tutorial I'm going to be going through how to paint realistic looking foliage using custom brushes. After watching a few tutorials and studying foliage I ended up settling on this technique. It uses a few layers and a mask.
I will be showing what brushes and colours I used throughout the tutorial. I've added links to the brush images if you want to download them.
Above is the finished painting. The foliage itself was painted in roughly eight minutes.
STEP 01
We're going to start off with just a background and then on a new layer “Trunks” paint in some trunks and branches for the foliage to sit on. It's best to make the trunks look like they already have some shadow on them as this will help out later on when the foliage is painted.
STEP 02
New layer above trunks - “Foliage 01”.
In this step we paint on the foliage clumps quite thick (especially near the edges) using the mid-tone colour. Once you have this painted you need to go back and delete most of the foliage just leaving the edges in place. You may need to switch between the paint brush and eraser for each clump if they're close together.
I'm using the same brush to delete as I am to paint in this step.
STEP 03
New layer above Foliage 01 - “Foliage 02”
This step is very similar to the previous except we want to paint over and just above the previous foliage clumps like the picture below. Once you have it painted in go back and erase a lot of the paint that is sitting above the darker foliage.
STEP 04
New layer below Trunks – “Foliage 03”
Next choose a shadow colour and begin painting in around the foliage already on the tree, we want to thicken everything up now and give the trees and bushes more depth.
STEP 05
New layer at very top - “Texture”
There are two ways to do this, either import a photograph of foliage and correct the colour to match what you have painted or you can do something similar to what I have below. To paint it just throw in a bunch of colours and make sure you have some white in there too.
STEP 06
New layer mask on - “Texture”
Now create a layer mask on the texture layer and using white with the layer mask selected paint over your foliage using the second [grunge 02] brush. The aim of this is to reveal small amounts of the texture, this will give the foliage some more variation and help to make it more natural. You don't want to do too much here or you'll lose what you've painted already.
STEP 07
New layer at very top - “Shadow” *Opacity = 70% *Layer mode= multiply
Here you choose a dark blue colour and with a regular brush paint in the shadowed areas. You can blend this slowly over the foliage clumps in the back and give a harsh outline on the front clump, this will separate the two.
STEP 09
New layer at very top - “Grass FG”
Finally we need to ground the foliage. To do this choose a grass brush and a dark colour and paint a layer of grass at the base of the trees. Next come back and paint over this (leaving some visible of course) with a bright grass colour that matches the rest of the painting.
I hope you've enjoyed this tutorial and learned something, see you next time :)
With my current Greece terrain I'm making I am going to be breaking my tradition of uninhabited wildernesses, to do that however I needed some buildings. I couldn't find the right roof tile texture and after spending a few minutes with the mouse and Gimp I had only made a placeholder texture and it wasn't very pretty.
I could probably have painted something but I had just come up with the idea to make the texture in Blender. To do that I made five tiles and gave them five slightly different materials, next I copy pasted them until I had enough tiles, threw in a black background, changed the camera off perspective to orthographic (to avoid any distortion) and this is what I ended up with:
Then it was time to hit F12 and wait for the render to come in.
It wasn't bad, but it was very clean and didn't look like it had seen any use. With that in mind I grabbed a photo of a grungy concrete slab and another of some old bricks I had taken ages ago and set them to overlay, this warped the colours a bit but a grey layer between them on about 50% opacity brought the saturation levels back over to something tasteful. I also planned to make this a generic "roof" texture that I could use with all of the buildings instead of textureing each one. Of course this meant that I couldn't have OA baked on, but there would be very little on the roof and it wouldn't be all that visible anyway due to the texture. By selecting one line of tiles and rotating by 90 degrees I had a center tile ... thing. By now the texture was looking much more realistic.
All that was left now was to throw it on the roof of my buildings which was done easily enough by placing the center of the roof with my center tile thing on the texture. It was looking good at that point, but I went ahead and made a low poly object set to the same texture that would look like the single row of tiles in the middle of the texture except raised above, that will make it look more convincing when viewed from something other than directly above.
And there's the finished roof, it'll be pretty dark in that house until some windows are put in, but it's looking good


