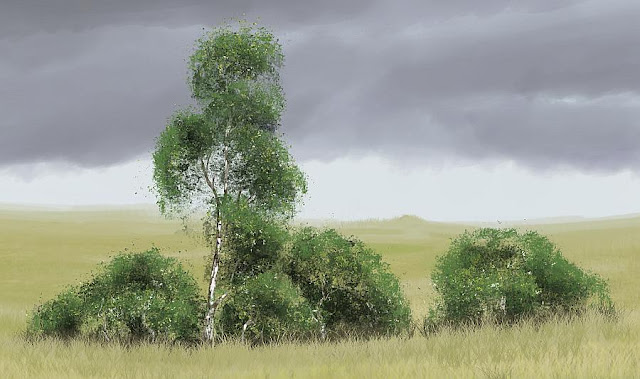
Hi, in this tutorial I'm going to be going through how to paint realistic looking foliage using custom brushes. After watching a few tutorials and studying foliage I ended up settling on this technique. It uses a few layers and a mask.
I will be showing what brushes and colours I used throughout the tutorial. I've added links to the brush images if you want to download them.
Above is the finished painting. The foliage itself was painted in roughly eight minutes.
STEP 01
We're going to start off with just a background and then on a new layer “Trunks” paint in some trunks and branches for the foliage to sit on. It's best to make the trunks look like they already have some shadow on them as this will help out later on when the foliage is painted.
STEP 02
New layer above trunks - “Foliage 01”.
In this step we paint on the foliage clumps quite thick (especially near the edges) using the mid-tone colour. Once you have this painted you need to go back and delete most of the foliage just leaving the edges in place. You may need to switch between the paint brush and eraser for each clump if they're close together.
I'm using the same brush to delete as I am to paint in this step.
STEP 03
New layer above Foliage 01 - “Foliage 02”
This step is very similar to the previous except we want to paint over and just above the previous foliage clumps like the picture below. Once you have it painted in go back and erase a lot of the paint that is sitting above the darker foliage.
STEP 04
New layer below Trunks – “Foliage 03”
Next choose a shadow colour and begin painting in around the foliage already on the tree, we want to thicken everything up now and give the trees and bushes more depth.
STEP 05
New layer at very top - “Texture”
There are two ways to do this, either import a photograph of foliage and correct the colour to match what you have painted or you can do something similar to what I have below. To paint it just throw in a bunch of colours and make sure you have some white in there too.
STEP 06
New layer mask on - “Texture”
Now create a layer mask on the texture layer and using white with the layer mask selected paint over your foliage using the second [grunge 02] brush. The aim of this is to reveal small amounts of the texture, this will give the foliage some more variation and help to make it more natural. You don't want to do too much here or you'll lose what you've painted already.
STEP 07
New layer at very top - “Shadow” *Opacity = 70% *Layer mode= multiply
Here you choose a dark blue colour and with a regular brush paint in the shadowed areas. You can blend this slowly over the foliage clumps in the back and give a harsh outline on the front clump, this will separate the two.
STEP 09
New layer at very top - “Grass FG”
Finally we need to ground the foliage. To do this choose a grass brush and a dark colour and paint a layer of grass at the base of the trees. Next come back and paint over this (leaving some visible of course) with a bright grass colour that matches the rest of the painting.
I hope you've enjoyed this tutorial and learned something, see you next time :)


No comments:
Post a Comment