Thursday, July 28, 2011

A study of light and shadow

A few days ago I came up with an idea for a study. I wanted to know how to paint various lights and also how to paint the value and colour of shadows correctly.

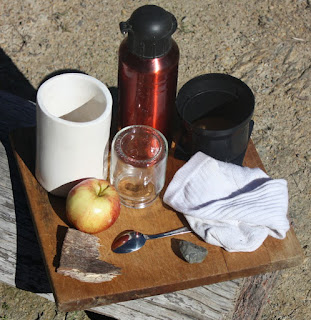
I grabbed a wooden board and threw a bunch of different objects on it, an old white sock, drinking bottle, a spoon, some broken bark, etc. Throughout the day I went about photographing this setup in different light at different times of the day, in shadow, with bounce light, I even did a few using my PC monitors as lights (turned out to be a pretty quick way of getting coloured light sources thanks to gimp). Here are some shots I took:


The main thing I wanted to try out here was to find out how to correctly shade shadowed objects. By taking two pictures at the same time of day - one in full sunlight and the other in shadow - I was going to use a multiply layer to paint on the lit one until it matched the shadowed one, switch the layer to normal and I'd have the answer to solve all my problems right?

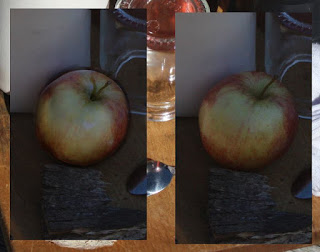
Here's the finished multiply layer over the apple in the light (left). I've added in the background from the shadowed shot for better comparison. Pretty similar?


The interesting part is when we change the layer mode to normal, that will reveal the colours that went into the realistic shadowed effect.


Perhaps I shouldn't have been so shocked, but this was an awesome moment. It's basically a dull chrome ball right? All the colours there and their values are a pretty good representation of the colours around my setup on the day of the shot.

I'm still not done with this, but I'm pretty sure that to get a realistic effect you work out the reflection on the object, however, I'm almost certain it's not really a reflection effect, it's more like like: for every point on the object the light must be calculated individually and the brightness and angle from that point must be taken into account.


Above, for the point chosen, light blue would be the main light source (assuming the object is in shadow). The sky is going to be brighter than the ground and the trees quite dark. The grass below would be bright, however it's on a very extreme angle so very little of it would be cast on the selected point.

It's been good though, I always had trouble with interior scenes with harsh artificial lighting, but I now understand it much more, especially how to colour those objects. Even though the colour changes that an object undergoes when in shadow are incredibly complicated studying it has helped me understand how it all works.
Sunday, July 24, 2011

Foliage Tutorial


Hi, in this tutorial I'm going to be going through how to paint realistic looking foliage using custom brushes. After watching a few tutorials and studying foliage I ended up settling on this technique. It uses a few layers and a mask.

I will be showing what brushes and colours I used throughout the tutorial. I've added links to the brush images if you want to download them.

 
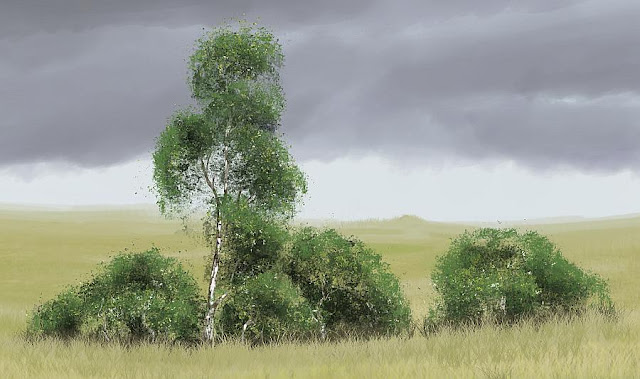
Above is the finished painting. The foliage itself was painted in roughly eight minutes.
STEP 01
We're going to start off with just a background and then on a new layer “Trunks” paint in some trunks and branches for the foliage to sit on. It's best to make the trunks look like they already have some shadow on them as this will help out later on when the foliage is painted.

 
STEP 02

New layer above trunks - “Foliage 01”.

In this step we paint on the foliage clumps quite thick (especially near the edges) using the mid-tone colour. Once you have this painted you need to go back and delete most of the foliage just leaving the edges in place. You may need to switch between the paint brush and eraser for each clump if they're close together.

I'm using the same brush to delete as I am to paint in this step.


STEP 03
New layer above Foliage 01 - “Foliage 02”

This step is very similar to the previous except we want to paint over and just above the previous foliage clumps like the picture below. Once you have it painted in go back and erase a lot of the paint that is sitting above the darker foliage.

STEP 04
New layer below Trunks – “Foliage 03”

Next choose a shadow colour and begin painting in around the foliage already on the tree, we want to thicken everything up now and give the trees and bushes more depth.

STEP 05
 New layer at very top - “Texture”

There are two ways to do this, either import a photograph of foliage and correct the colour to match what you have painted or you can do something similar to what I have below. To paint it just throw in a bunch of colours and make sure you have some white in there too.

STEP 06
New layer mask on - “Texture”
Now create a layer mask on the texture layer and using white with the layer mask selected paint over your foliage using the second [grunge 02] brush. The aim of this is to reveal small amounts of the texture, this will give the foliage some more variation and help to make it more natural. You don't want to do too much here or you'll lose what you've painted already.

STEP 07

New layer at very top - “Shadow” *Opacity = 70% *Layer mode= multiply

Here you choose a dark blue colour and with a regular brush paint in the shadowed areas. You can blend this slowly over the foliage clumps in the back and give a harsh outline on the front clump, this will separate the two.

STEP 09


New layer at very top - “Grass FG”


Finally we need to ground the foliage. To do this choose a grass brush and a dark colour and paint a layer of grass at the base of the trees. Next come back and paint over this (leaving some visible of course) with a bright grass colour that matches the rest of the painting.


I hope you've enjoyed this tutorial and learned something, see you next time :)

Saturday, July 9, 2011

House Roof - Texture from Scratch

With my current Greece terrain I'm making I am going to be breaking my tradition of uninhabited wildernesses, to do that however I needed some buildings. I couldn't find the right roof tile texture and after spending a few minutes with the mouse and Gimp I had only made a placeholder texture and it wasn't very pretty.


I could probably have painted something but I had just come up with the idea to make the texture in Blender. To do that I made five tiles and gave them five slightly different materials, next I copy pasted them until I had enough tiles, threw in a black background, changed the camera off perspective to orthographic (to avoid any distortion) and this is what I ended up with:


Then it was time to hit F12 and wait for the render to come in.


It wasn't bad, but it was very clean and didn't look like it had seen any use. With that in mind I grabbed a photo of a grungy concrete slab and another of some old bricks I had taken ages ago and set them to overlay, this warped the colours a bit but a grey layer between them on about 50% opacity brought the saturation levels back over to something tasteful. I also planned to make this a generic "roof" texture that I could use with all of the buildings instead of textureing each one. Of course this meant that I couldn't have OA baked on, but there would be very little on the roof and it wouldn't be all that visible anyway due to the texture. By selecting one line of tiles and rotating by 90 degrees I had a center tile ... thing. By now the texture was looking much more realistic.


All that was left now was to throw it on the roof of my buildings which was done easily enough by placing the center of the roof with my center tile thing on the texture. It was looking good at that point, but I went ahead and made a low poly object set to the same texture that would look like the single row of tiles in the middle of the texture except raised above, that will make it look more convincing when viewed from something other than directly above.


And there's the finished roof, it'll be pretty dark in that house until some windows are put in, but it's looking good

Followers